Sunday, January 10, 2010

Binocular Basics - 2: numbers


All binocular models have a a brand and model name followed by a series of numbers to describe them. This "nomenclature" can give you some important information about the binocular. However, it requires a bit of knowledge to understand how these characteristics affect performance.

The binocular model above is a Leica 7x42 Ultravid HD. Leica of course is the manufacturer, and the model name is the "Ultravid HD". The model name is derived from the Latin root "vid" meaning "to see", and HD indicates that this model contains the highest level of flouride-infused glass, offering the best possible color rendition possible. Manufacturer & model numbers are of course random and vary between models, and don't tell you much about performance. The "nomenclature", however, (the series of numbers) are consistent throughout the industry and tell the consumer a lot about the product.

The product above is an older model, a Leica Trinovid 10x42 BN. Lets consider just the nomenclature on this product the "10x42" portion - "10x" describes the power of magnification. As you'd suspect, this binocular magnifies the subject 10 times. This means your subject will appear 10 times larger or 10 times closer than it does when viewed with your eyes alone.


The image above is a representation of a subject at 1x and 10x respectively. Unfortunately, at this size the graphic is not very effective because it is difficult to see well. The most popular powers of magnification in binoculars are generally 7x, 8x, and 10x. It is common for people to assume more magnification is better than less. However, it is important to remember that you are not only magnifying your subject, but you are also magnifying all the hand shake and movement from wind, etc.

Most people cannot hold a binocular with more than 10x magnification still enough to benefit from the increased power. As a matter of fact, many are surprised to realize that when comparing binocular models within the same manufacturer's line, that they resolve details better with a lower-powered binocular. When trying to decide which binocular is right for you, it is best to use a resolution chart (the optical equivalent of an eye chart). In lieu of a resolution chart, a dollar bill (or similar) usually offers suitable fine print for this test. Simply, hang one to the wall and compare which binocular power within a given line allows you to discern more detail. For me, I find I can discern more detail with a lower-powered binocular. I just can't hold a higher-powered glass steady enough to benefit from the increased power, and typically use a 7x42 binocular (7 times magnification) - I feel I see more detail on a smaller and brighter subject.


The second number describes the diameter of the objective lens in millimeters. The binocular above is an Ultravid 8x32. It magnifies 8x and the objective lens is 32 mm wide. In this binocular a 32 mm circle of light enters the binocular (the diameter of the objective), however for every 1x of magnification you must reduce the size of the circle of light entering your eye by the same power. Therefore, the circle of light seen coming out of the eyepiece & entering your eye is 32 mm divided by 8x, or 4 mm (see above). This circle of light is defined as the "Exit Pupil".
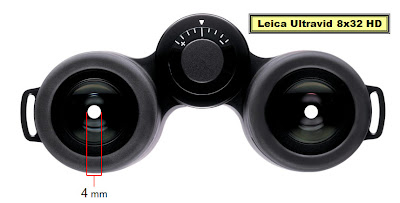


How does exit pupil affect binocular performance?.... Well again, all else being equal (assuming we are considering one particular line of a given manufacturer's products), a larger exit pupil means more light enters your eye.


In bright light, when your pupil is fully constricted, exit pupil is less important. However, in low lighting conditions your pupil dilates/expands. So an exit pupil of 4 mm may not fill every cone and rod in your pupil, where the 7x42 above with a 6 mm exit pupil will deliver a brighter image with superior resolution under these conditions. Also, as your hands shake, a smaller circle of light will be harder to stay over your pupil, while a larger exit pupil will continue to deliver consistent light to your eye. While your brain may well assimilate the image, over a full day's use your eye may feel more strain and discomfort with a smaller exit pupil, compared to the binocular with the larger exit pupil (once again assuming the same binocular quality/line).


Of course, this is but one consideration in binocular selection, and each individual will have to balance power & objective size, versus binocular size/weight & ease of use/ergonomics. This personal balance will obviously vary from user to user, but I think it safe to say that if "lightweight" and "compact" are two of your main criterion for binocular selection, it is true to suggest that within a given line, this cannot be achieved without sacrificing some optical performance. However, we will consider this fully in another post!

Thursday, January 7, 2010

Binocular Basics 1

This is the first post in a series that will review binocular basics for those interested. As you'd expect I'll start at the very beginning with very basic information. Throughout the series though the information will get more complex. Feel free to comment or question in the comments section below though.


Generally speaking, binoculars are manufactured in two basic designs in regard to prism assembly and structure. The first is a "porro prism" design which is easily recognized by shape. In a porro prism binocular the eyepiece or ocular lens assembly, is offset from the distal objective lens assembly. In most cases the objective lens will sit outside the eyepiece, although some manufacturers offer compact "reverse porro prism" designs where very small objective lenses nearly touch and are much closer together than the ocular.
I've superimposed the typical shape of a porro prism assembly in red lines above while the green dashed line shows the light path as it travels through the binocular. Note how the light enters the objective lens cell, passes into the upper prism, is reflected 2 times, passes into the lower prism block, bounces two more times and finally exits through the eyepiece.

Roof prism binoculars are quite different in structure and are generally favored for their superior ergonomics. In a roof prism binocular the ocular and objective lenses are lined up in a straight line (not off-set as in porro prism designs). Once again, I've drawn a rough roof prism assembly in red and the dashed, green line represents the path of light travel through the system.
As always, the light enters through the (typically larger) objective lens and travels up to the prism assembly. The assembly (in this case) is compromised of two glass blocks just as in the porro design at top. Unlike the porro however, a roof prism assembly reflects the light 5x. The area where the two blocks meet is called the "interface mirror", and this surface has to both reflect light at points and allow light to pass in others. It is very difficult to accomplish this without losing light through back reflection and/or refraction though, and the angles are more crucial than in simpler porro designs. As such, roof prism binoculars average more expensive than a comparable porro prism.

This higher price adds some very real advantages though to include: superior ergonomics, better waterproofing, and a higher impact resistance (again assuming a comparable level of manufacture and design). Roof prism binoculars generally offer better ergonomics through their slimmer design, as porro prism binoculars average bulkier due to the offset design.
Most porro designs utilize a moving external bridge (see above) that slides the oculars in and out to achieve focus. Once again, this is a simpler and cheaper manufacturing design, however it suffers from one predictable flaw. As these tubes slide over top of one another you are continually wearing the seals that keep moisture out and inert gases in. Over time these will wear to the point of failure leading to moisture problems and internal fogging. In addition this external bridge is very susceptible to impact damage, leading to alignment problems as well.

In most roof prism binoculars the focusing system is internal. In the case of the Leica Ultravid above, internal "field collector lenses" move back and forth between the prism assembly and objective lens cell. Since this system is completely internal it is much more impact resistant, and since you are not constantly wearing the seals through abrasion the roof prism design maintains its water proofing & fog proofing.

Summary
As a final note, I need to qualify implications above. I've used words like generally & typically above and also used qualifying statements like, "assuming comparable quality". In most cases in optics the old adage, "You get what you pay for" is true to its word. In looking at binocular prices quickly online, I note full-sized porro prism binoculars (compacts excluded) range from just over $25 up to about $1,200 US. By comparison roof prism prices ranged from about $50 on up to nearly $3,000 US. Assuming less expensive binoculars are created by cutting costs on raw materials (quality of components), manufacturing costs (quality of construction), & labor costs, I certainly expect that a $1,200 dollar porro prism would out-perform a $100 roof prism in every way. However, if we compared the highest quality premium roof prism versus the highest priced porro prism, I'm certain most users would prefer and gravitate toward the roof prism. I say this from my own personal preferences, my experiences of meeting and birding with thousands of birders annually (and noting what binoculars they are using), and from my knowledge of the many independent reviews that have appeared in industry articles in varying popular publications. All suggest roof prism designs are favored across the board by most users.

Friday, January 1, 2010

Canopy Critters from Panama

male Brown-throated Three-toed Sloth resting in a tree near Canopy Tower

In an earlier post I'd mentioned how Canopy Tower was an ideal location for digiscoping, but I didn't explain fully why that is. I will try to explain this more thoroughly and share some of the many pictures I was able to capture from the tower as well! Let me backtrack and review a bit for those that are perhaps just joining us. Digiscoping (at least as I practice it) is coupling a digital point & shoot camera like the Leica C-Lux 2 that I used behind the Leica APO Televid spotting scope for these pictures. Again my primary aim here (pun intended) is to capture wildlife images with the spotting scope that I carry most of the time in my pursuit of birds and wildlife anyway. As such, by simply adding a tiny camera and digital adapter to a hip pouch or shoulder strap, I'm ready to take stunning images at a moment's notice!

Hoffman's Two-toed Sloth in trees at the Canopy Tower

The Canopy Tower offers an ideal situation for digiscoping not only because you are in the tree tops in a safe, stable structure with the creatures that utilize the canopy, but because many of these creatures are anywhere from 50 to 150 feet away. With patience most will come close enough for standard SLR and telephoto lenses, but I tend to be impatient and love the fact that this digiscoping set up allows me to achieve the equivalent of a 6,000 mm lens (120x magnification)!
Geoffrey's Tamarin digiscoped from Canopy Tower, July 2007

This allows me to get up close and personal with the wildlife even when it is farther away. The Geoffrey's Tamarin above was actually much closer but I still shot this at a 35 mm equivalent of a 1720 mm lens because I wanted to see it's whiskers! ;)

EXIF data:
35 mm equivalent on camera = 86 mm
scope zoom eyepice at 20 power
or 86 mm x 20x = 1720 mm equivalent lens.
Sloth hangs out at Canopy Tower

To put that into perspective, the longest telephoto lens readily available on the commercial market is an 800 mm lens. So even at nominal camera zoom I'm far exceeding the capabilities of most telephoto systems. Plus, an 800 mm lens can reach over 2 foot in length, weigh over 20 pounds, and force you to have to re-mortgage your house. ;p The Sloth above was actually scratching but I've entitled this shot "the Thinker!"
Mantled Howler Monkey (male) hangs down to get to Cecropia fruit

There's always a good assortment of mammals "hanging out" in the trees surrounding the Canopy Tower. Both of the aforementioned sloth species, preferred the loner approach but the troops of Monkeys always seemed to come through en masse. The small Tamarins were less numerous and came and went quickly during our stay, but the Howlers were regular and numerous throughout our stay. One guest told me that the large wound on the side of the male above was a Bot Fly larvae, but don't know this for certain. Seems plausible. He explained that Vampire Bats can often make the initial wound and allow the Bot Fly to get under the flesh. Makes for a good story but I can't say for certain if this is the case.
Does anyone reading know more about this relationship or hypothesis?... would love some feedback.
male Howler Monkey stares intently at some distant subject

The ever vociferous and social Howlers were a treat to watch. Even though they are a common species throughout much of the Neotropics, I don't see these in the wild here in Florida so it was a great treat.
female Howlers with tail at the ready feeds on tree top fruit

The female Howlers were notably slimmer and smaller than the mature males lacking the distinct "mane" shown by the latter. The animal above was taking full advantage of fruiting Cecropia that surrounds the Tower. It is also worthy of note that this is not a tower in the typical sense (a narrow spire sticking up) but more of a very wide 4 story building with large observation deck ringing the top. This allows easy panoramic viewing options in any direction which is also advantageous for viewing the birds and wildlife moving through the tree-tops. It's a very unique and beautiful perspective for observing the "Canopy Express".
Mantled Howler Monkey digiscoped July 2007, Canopy Tower

These are merely a few of the many species that could be viewed by the tower and to see and digiscope them all will undoubtedly take more trips! I will share more from our 8 day trip, never fear, but for now I'll wrap it up by saying the trip was more fun than a Barrel full of Monkeys (or better yet a wild troop in their natural habitat), and we are already planning on offering this workshop again next year.
I can't wait!

Friday, December 18, 2009

Missing Peregrine!

Ahhh... Bosque Del Apache... for anyone who has experienced birding here it brings to mind visions of fall and winter magic! This gem of the National Wildlife Refuge system here in the US, offers unbelievably wondrous natural spectacles. Many come to view the spectacle of the crane and waterfowl migration which is indeed amazing, but there is SOOO much more to appreciate as well.

adult Prairie Falcon, digiscoped Bosque Del Apache, NWR, NM 11/19/09

The morning of November 19th started like most other fall mornings at Bosque, enjoying the lift-off of Sandhill Cranes and Snow Geese just before first light. Shortly thereafter, I was forunate to encounter an adult Prairie Falcon perched at roadside very near the visitor's center. In the early morning light, the bird was washed in a wonderful pink glow. The sun was just on the horizon at this point and it looked to be another fabulous day! The remains of a freshly plucked "Red-shafted" (Northern) Flicker lay beneath this perch. It was obvious this bird hadn't recently eaten a Flicker, as it's crop would have been bulging if it had. Clearly, someone had eaten this bird here though and an adult Prairie Falcon would certainly be a good candidate. Maybe that was last night's dinner!?!...

American Kestrel, male digiscoped with Leica APO Televid 65 mm scope & D-Lux 4 camera


American Kestrels are another common falcon species, and we saw many on this day. The male above sat on Route 1 just before entering the refuge from the North. I watched him hunting over 3 days with his bum foot. Even though he had no use of it, he seemed to be faring well. Both he and his tolerent mate (shown below) were camera hogs. They'd obviously taken up residence here knowing how many photographers visit and were hoping for extra photos! ;p
OK - maybe not, but they were remarkably tolerent by Kestrel standards and allowed me to park my vehicle close enough to get some very nice images!
female American Kestrel, digiscped near Bosque del Apache NWR entrance, 11/19/09
Upon breaking for lunch I spotted my third falcon species of the day again just outside the refuge entrance on route 1. A distant Merlin was perched on a phone pole in harsh backlight. The photo below normally would be deleted but it helps to tell the story. Hmmm... 3 falcon species by mid day and I knew of two others being reported near daily in and around the refuge.
falcon species #3 a distant, backlit Merlin in harsh light!

Near sunset, there was time for a short trek around a portion of the loop on the refuge. I was really hoping to run into the gorgeous young Aplomado Falcon that was being reported, and in the late evening light I was fortunate enough to find it. It was amazingly cooperative again and I was able to get a number of nice photos in the warm evening light. Since, I was digiscoping, I had the advantage of incredible magnification so did not have to get too close to the bird!


immature Aplomado Falcon digiscoped through Leica APO Televid 65 mm 11/19/09


Whoa, four falcon species on the same day and the same place. With all of the prey species there where clearly a Peregrine Falcon around somewhere. I scanned the horizon in vain as the light faded. I was hoping for 5 species of falcon in one day in the US. This is a very difficult task to pull off. Sadly my Peregrine didn't show so I had to "settle" for merely enjoying 4 species (although I had 5 for the trip). Clearly though I have no room to complain it was a spectacular day with stunning views of fabulous birds.

Wednesday, December 16, 2009

Will the smaller 65mm scope fit my needs?...


One of the big questions spotting scope consumers have to answer is, "which size scope should I buy?" Like most manufacturers, Leica offers two different scope sizes: a larger 82 mm model (bottom) and a more compact 65 mm model (at top). The mm listing is the physical diameter of the objective lens which is opposite the smaller eyepiece. A larger objective lens allows more light to enter the optical system, meaning there is a larger circle of light entering your eye (or camera if digiscoping).

Consumers have to balance absolute optical performance with portability, and ease of use in the same way they do with binoculars. Obviously, this is a very personal decision and one that each individual has to make for themselves. To answer this fully one has to consider their individual habits to include: 'will I be using the scope at last light or first light or in very dark conditions?' (tropical rain forests for example), and 'will I tend to not carry a heavier scope?' I suspect the latter question is most important actually because if the size and weight will preclude or dissuade you from using the scope then clearly the more compact, lightweight option is for you!

left to right Kenn Kaufman, Bill Thompson, III, and Pete Dunne at Asa Wright Nature Centre
Along that line, while I certainly feel the APO Televid 82 mm represents the pinnacle of optical performance, I would never discourage anyone from looking toward the smaller APO Televid 65 mm spotting scope either. I think it is superb and it definitely outperforms its predecessor and rivals the performance of our older 77 mm models. Naturally, being an employee of Leica, I'd suspect people will find my commentary suspect, so I'd also like to offer some thoughts from other unbiased individuals.

Bill Thompson III of Bird Watcher's Digest magazine made the following comments regarding the new Televids after trying both on a recent trip to Asa Wright in Trinidad and Blue Water's Inn, Tobago, '...I used the 82 & 65 and loved them both, but where portability and weight were a factor, I preferred the 65 mm. Even in digiscoping where light is crucial, I feel I only missed the light gathering of the 82 mm when I was digiscoping Oilbirds in near complete darkness...'

Read more of Bill's exploits in Trinidad & Tobago here:
http://billofthebirds.blogspot.com/search/label/birding%20in%20Trinidad%20and%20Tobago
and particularly about digiscoping at Asa Wright Nature Centre here:
http://billofthebirds.blogspot.com/2009/08/digiscoping-at-asa-wright.html

Of course, while commentary like mine and Bill's (and others) is clearly helpful, these are still opinions and as I already pointed out scope selection is a very personal endeavor. As such, I feel that often images can speak louder than words. While I've carried the 65 mm Televid scope around, I hadn't really run it through its paces properly so I decided to use it solely at the recent "Festival of the Cranes" at Bosque Del Apache NWR last month.

The following images were all shot through the Leica APO Televid 65 mm spotting scope using the Leica D-Lux 4 camera and matched digital adapter at the festival. I'll let the images speak for themselves and leave it to you to judge your thoughts on performance!

No crane fest would be complete without cranes,
so here are two Sandhill Cranes dropping in from on high.

Townsend's Solitaires were common in Juniper habitats
in the foothills of the nearby mountains.

Greater Sandhill Cranes probe in mud for small invertebrates!

fresh plumaged Red-winged Blackbird males show
tawny-golden feather edges on their backs.

the bird above shows these feather edgings on its crown as well.

an adult Prairie Falcon is washed in pink early morning light as the sun just rises!

an adult female Northern Harrier (Hen Harrier in Europe...) cranes its neck

an "Oregon" race Dark-eyed Junco feeds on seed heads

immature Aplomado Falcon perched up at sunset

Bald Eagle pair sillhouetted at sunrise

male American Kestrel perches on a wire near noon!

Thursday, December 10, 2009

The Magic of Cape May

Recently, through the glamorous life of travel, I returned to Florida from Newark, NJ. The interesting thing was this was following the annual Cape May Bird Observatory (NJ Audubon) fall bird show. So with a left side window I was able to enjoy the scenery as a southbound hawk might see it (even though I was considerably higher)!


The first landmark I recognized was the north pointing peninsula, Sandy Hook. A fair hawk watching spot in its own right. North bound spring migrants use this spit of land to get halfway across to Long Island and other points north.


New Jersey has always gotten a bad rap for the human congestion in the northern portion of the state, but heading south from Sandy Hook, most of the coast is a giant system of contiguous salt marshes and waterways! If you blow this image up you can just make out the only real heavy human congestion in this whole area. Note the skyscrapers of Atlantic City near the center of the image on the coast.

Continuing south from here was that magical south facing peninsula itself. Like a giant avian funnel the Delaware Bay and Atlantic Ocean conspire to offer birders unimagineable concentrations of all types of migrant birds at the very southern tip of this land mass.

famed Cape May lighthouse and convent photographed D-Lux 4 camera, Oct 2009
This magical spot is of course, Cape May, New Jersey. A mecca for birders worldwide who descend on this community by the thousands each weekend in September & October. One of the crowned jewels of this fabled town sits literally in the shadow of the Cape May Point lighthouse in the state park here. The Cape May Hawk Watch has been run every year for... well... err.. a long time. I hate to stop and do the math actually because when I do, it reminds me of just how much further from young I get every day. It was actually 22 years ago when I first conducted this hawkwatch. Every day from sunise to sundown beginning in mid August and wrapping up near early December, I'd sit on a smaller platform that sat on this very site and count each and every hawk I saw.


But the Cape May Hawk Watch had already been a staple in the birding community long before I was invited to take the prestigious post and earn my official membership to "National Brotherhood of Professional Hawkwatchers". I'd guess the official hawkwatch dated back at least 12 years before this, and the stories of shooters lining the streets to hunt hawks here are infamous dating well back toward the turn of the century. The famed father of American birding hiself, Roger Tory Peterson, hitch hiked to Cape May as a very young man to witness the amazing migration spectacle here and was taken in by a local family. For dinner they served (what else?!?...) Sharp-shinned Hawk. Later in life at a talk I remember Roger recalling this and suggesting that it actually tasted a lot like chicken!


On some days, particularly in late October as the migration tapers off a bit, the platform can be a bit slow...


but when the winds turn to from the NorthWest people and hawks will come out of the woodwork. On these days it is nothing to see thousands of hawks and if you don't want to work to hard at it, never fear there will always be nice close views. Often Shrp-shinned & Cooper's Hawks will swing by at or below eye level hugging the contours of the brush as Accipiters are prone to do. Falcons like Peregrines, Merlins, and Kestrels will buzz low overhead offering fabulous views, while Northern Harriers (or Hen Harriers to our friends on the other side of the Atlantic) will course low over the marshes just in front of the watch. The official hawk counter is responsible for trying to spot and count them all but the rest of us (including the helpful interns looking the wrong way above) are free to just enjoy the views of the closer birds if we choose.
On Friday night during the festival a cold front passed and the winds turned Northwest at 10-20 mph! Knowing every birder in the point would make their way to the hawkwatch I set up my extra binoculars and spotting scopes on the hawkwatch and was sharing these with any who cared to borrow a pair to view the fantastic natural phenomenon that was unfolding right above our heads. There were hawks migrating everywhere and the views were phenomenal!

As the crowds broke in the evening I put my extra binoculars away but stayed on long after everyone else had left. I continued scanning even though the birds had mostly settled in and the flight was done for the day. I was hoping perhaps for a Short-eared Owl or some other late surprise and candidly feeling a bit nostalgic as I stood alone on the platform with my thoughts. As the final rays of light faded, an American Bittern flapped purposefully across the marsh out front and dissappeared behind a thick section of reeds. I spotted a Peregrine Falcon as it labored across the cloud-strewn sky, coming from offshore carrying some unidentified prey that had made the ultimate sacrifice on this treacherous journey south.
After surrendering the Peregrine to the darkening sky, I hoisted my scope & tripod and slowly retired for the evening. Still enjoying the rush from the spectacle I'd enjoyed!


Wednesday, October 28, 2009

quick comparison

In the comments section of my last post I was asked why I prefer digiscoping. The crux of my explanation was that I'm a birder first and photographer second, but I also alluded to the differences between the two set ups particularly as it relates to magnification.


The image of the Red-headed Woodpecker above was digiscoped through the Leica APO Televid 82 mm spotting scope with the D-Lux 4 camera at the equivalent of near 1800 mm lens. (ISO 100, 1/160th sec, f/2.8, +0.3 stop)


This is the same image with a bit of photoshop magic applied. I've assumed 400 mm is the most common length lens for bird photography, with a 1.5x crop factor on the DSLR body. What this means in lay terms is that the sensor in many common DSLR bodies is smaller than a 35 mm film frame so the subsequent captured image is magnified a bit to reach the size of a 35 mm film frame. The net effect is that a camera lens that is rated as a 400 mm on a film body, will offer 1.5x the magnification, or the subsequent subject size will be comparable to that of a 600 mm lens shot on 35 mm film.


At any rate, 600 mm is 1/3 rd the size of my 1800 mm so in the image above I've reduced the size of the original image to 1/3rd the size of the original. Then utilizing cut & paste techniques filled in to create a uniform sky and extended the pole to offer a the illusion of an accurate comparison of subject size difference between my image and that of someone shooting with a 400 mm lens right next to me.


I took my image of the bird from across the road on top of a phone pole. The DSLR photographer could naturally move closer, but the perspective would change dramatically and the subsequent image would be staring straight up the bird's back or side to accomodate a closer distance.


Wilson's Plover digiscoped w/ Leica APO Televid 77 & C-Lux 2 camera

The image above was taken 2 years ago on the "beach photo safari" at the Florida Bird & FotoFest in St. Augustine, FL. The walk is designed for long lens photogs to get images of gulls, terns, and shorebirds in late evening light. They are driven out to a distant point of a barrier island where these birds concentrate. When they arrive, they target a specific bird or group of birds, then drop to their bellies and slowly crawl across the sand toward their subjects.

I went along to bird and see what was out there as this point would normally require a VERY long trudge through sand taking a couple hours. As the happy photogs were slowly inching toward their subjects I happily snapped a few shots from the truck over their heads not even bothering to crouch let alone belly crawl.

Then I continued birding recording over 30 species of birds including other gems like Snowy Plover, Lesser Black-backed Gull, Northern Gannet, Red Knot, and 6 species of terns. I was the only one in the group carrying binoculars let alone a scope. About an hour later one happy photog returned to the truck wet and cold, and proudly showed me his best image. He didn't know what it was but was thrilled with the result he'd gotten and asked me what it was. I explained it was a Wilson's Plover and pulled my point & shoot out of my pocket and showed him near the exact image as seen above. So in this instance at least it seemed that digiscoping produced near the same exact result with much less effort with a lot of time left over to appreciate the many bird species out there.

Granted, if a Peregrine had winged up the beach, I would not have gotten an image likely by digiscoping, but I'd still have enjoyed the view of the mighty bird streaking past. If one of the beach bound photographers had even noticed the bird going by and knelt or stood up they might have gotten the image, but would still not have the appreciation for the powerful flight with wingtips arcing smoothly up and then rolling downward like a wave while peering through their small viewfinders.

As I said at the outset, it's just a matter of preference and perspective and under varying conditions each style of photography will outperform the other. If you are more likely to tuck the binoculars away and do without a scope, and are willing to creep or sneak in on birds to get within 20-30', then the DSLR with telephoto is likely the way for you. For me though, I prefer to simply setup the scope, mount the camera and take the shot to not miss too much of the wildlife activities around me.