Showing posts with label Leica digiscoping. Show all posts

Wednesday, May 19, 2010

more with the Leica V-Lux 20

handheld digiscoped imagetaken with new Leica V-Lux 20 at 75 mm equivalent

Following up on the comments from the last blog post discussing the performance of the NEW Leica V-Lux 20 compact superzoom digital point & shoot camera. Clearly as a stand alone camera it functions swimmingly. but above and below I will show some more performance proofs from the V-Lux 20 as a digiscoping camera. In the last post I showed a number of images with the camera zoom near minimum, hand held behind the Leica 20-50x wide-angle zoom eyepiece and APO Televid spotting scope. The question was asked at what point of zoom and to what degree do the images degrade. At minimal zoom (as shown in the image in my past post of the Purple Martin pair), you get a solid defined vignetted edge on each corner with camera zoom at a 35 mm lens equivalent.
With camera zoom near 75 mm equivalent (above in this Great Crested Flycatcher image) the field begins to collapse. It presumably continues to collapse as more zoom is added, but unfortunately I only had the camera to test for one full day and was trying to get nice wildlife shots rather than doing standardized tests.
Eastern Wood-Pewee digiscoped w/ Leica V-Lux 20 through APO Televid scope

The Eastern Wood-Pewee above was again taken with the new V-Lux 20 handheld behind the Leica APO Televid 82 mm spotting scope. The camera was zoomed to a 44 mm lens equivalent and the scope zoom was at lowest power (25x wide angle). This image is completely unaltered and shown as uploaded from the camera. You can see that with this combination of camera & eyepiece zoom there is no visible vignetting at all! While I've always been a huge fan of using adapters to stabilize a digiscoped image it is nice that this camera is a pocket-sized (compact) superzoom with 12x optical zoom (300 mm equivalent) that can be easily handheld on this scope / eyepiece combination with incredible results. It is just another tool in the arsenal for those who want something that is more versatile as a stand alone and still able to be coupled with the scope to reach magnifications well over 1,000 mm equivalents.

Eastern Wood-Pewee digiscoped Magee Marsh, OH 5/14/10

Again with 14.5 megapixel resolution at my disposal, I was able to easily crop the image to a portrait mode with the bird and snag filling most of the frame with negligible loss of quality.
male Cape May Warbler digiscoped through Leica APO Televid 82 w/ V-Lux 20


Yet another example of a high-quality handheld digiscoped image is shown above. This adult male Cape May Warbler image was once again taken simply holding the new Leica V-Lux 20 behind the APO Televid eyepiece.
- Program mode, ISO 200, 1/250th sec, f/3.7, +1 step EV, auto image stabilization, 42 mm lens equivalent & 25x on scope zoom eyepiece


As a final example of the camera's prowess as a digiscoping tool, here is a digiscoped video (videscoped) taken by holding the V-Lux 20 camera behind the scope eyepiece once again. This video shows an adult male Baltimore Oriole feeding. In this instance the wind reduction feature was activated and the video was recorded at the highest level of quality at 1280x720 pixels @ 60 fps (frames per second)!

Needless to say I'm VERY impressed after being able to "play" with this little gem of a camera for only one full day. Unfortunately, I had to send it back though, so will have to wait before showing more tests & results. Never fear though, there will certainly be some!

Tuesday, May 18, 2010

NEW Leica V-Lux 20 Breaks all the rules!!!

brand NEW Leica V-Lux 20 compact superzoom point & shoot camera

I was working the "Biggest Week in American Birding" in Ohio last week and the local sales rep loaned me his sample of the new Leica V-Lux 20 to test. I fully expected that I would be able to use the 12x zoom (300 mm equivalent) effectively to capture images of closer birds seen along the boardwalk at Magee Marsh in Oak Harbor, OH. This was a certainty and the camera performed "spot on" in this regard. At 14.5 megapixels with high def movie mode and built in GPS, I was looking forward to playing with this and as you can see from the image of below I was not disappointed!


male Northern Parula image taken with the new Leica V-Lux 20 camera 5/14/10

The colorful male Northern Parula shown above was taken by simply holding this tiny pocket-sized camera up, zooming and snapping the image! Obviously the bird cooperated by being close and at eye-level, but that is why so many birders visit this gem of a site during spring migration; for "in-your-face" views of these vibrant migrant birds. (taken at max zoom - 300 mm, program mode, ISO 200, 1/250th sec, f/4.9, +1 ev, with optical image stabilization and built in flash activated for fill).

Purple Martin pair @ Oak Harbor, OH 5/13/10

Those who know me, know that I am a digiscoping freak so despite the fact that "superzoom" cameras don't lend themselves to digiscoping, I'm sure you know I had to try this new "compact superzoom" behind our new wide-angle scope eyepiece to see how it worked for myself! The above is the exact image completely unaltered that I took through the scope when I first tried this on the evening of 5/13/10.

Amazingly, the Leica V-Lux 20 broke all the digiscoping rules and actually worked f0r digiscoping on its first test above. I was completely stoked! This was handheld behind the Leica APO Televid spotting scope with the wide-angle zoom eyepiece set a bit over 25x and the camera zoom set at a 35 mm equivalent.

Purple Martin pair digiscoped with NEW Leica V-Lux 20 camera

With 14.5 megapixel at my disposal, I was easily able to crop up and eliminate the dark circular frame to capture both the male & female birds (above) and then cropping further even the female alone as below!


female Purple Martin cropped from digiscoped image above


On the way back to the car (near 7 PM), I found my next photo opportunity and tested my luck again. A male Baltimore Oriole was singing unabashedly in an oak tree at the edge of the parking lot. I quickly set up my scope, pulled the V-Lux out of my shirt pocket and held it behind the scope eyepiece. This time I had the scope zoom at minimum 25x, and there was no vignetting around the frame! The image below is again completely unaltered. This is as it turned out by simply holding the new V-Lux 20 to the wide-angle eyepiece and shooting the image! Note there is just the tiniest hint of black vignetting at the lower right corner but otherwise nothing.

adult male Baltimore Oriole digiscoped with Leica V-Lux 20 evening 5/13/10
Image properties:
ISO 200
shutter speed: 1/80th sec
f/3.5
+0.7 step EV
35 mm equivalent

Baltimore Oriole digiscoped image slightly altered.

In the above image I've taken the liberty to add ~10 seconds of photoshop magic, cropping slightly to eliminate the dark corner and some of the "blown out" sky , and adding a bit of "shadow/highlights", but nothing more for the finished look above. At any rate, it is clear I need to get a V-Lux 20 of my own and begin experimenting some more both behind the spotting scope and as a stand alone unit! On 5/14 & 15 I took some more and better images and videos using the same camera scope combination which I will highlight next!

Sunday, March 14, 2010

Carribbean visitors

dark morph Red-footed Booby digiscoped with Leica APO Televid scope & D-Lux 4

Made a trek with my son to the Miami area to enjoy the two celebrity birds visiting from the Carribbean! Above is the Red-footed Booby that has been in the area for the past couple of months.


La Sagra's Flycatcher at Bill Baggs Park in Key Biscayne, FL

Just as popular, has been the La Sagra's Flycatcher that has thrilled many observers at Bill Bagg's State Park in Key Biscayne, Florida. We enjoyed fantastic views this AM as the bird fed very actively and called repeatedly. Another birder photographing complained that digiscoping was too ineffective compared to his DSLR setup, but I rattled off nearly 20 frames in less than 1/2 hour and enjoyed 5 to 10x the magnification. I was not unhappy with these images obviously! All were shot with the Leica D-Lux 4 point & shoot camera, through a Leica APO Televid 82 mm spotting scope.

rare La Sagra's Flycatcher, digiscoped on Key Biscayne, FL 3/14/10

Both the La Sagra's Flycatcher and the Red-footed Booby are species commonly found throughout the Carribbean and rarely seen in the US only in Florida. There has been one of each of these species, hanging in the greater Miami area for a couple months now!

Friday, January 1, 2010

Canopy Critters from Panama

male Brown-throated Three-toed Sloth resting in a tree near Canopy Tower

In an earlier post I'd mentioned how Canopy Tower was an ideal location for digiscoping, but I didn't explain fully why that is. I will try to explain this more thoroughly and share some of the many pictures I was able to capture from the tower as well! Let me backtrack and review a bit for those that are perhaps just joining us. Digiscoping (at least as I practice it) is coupling a digital point & shoot camera like the Leica C-Lux 2 that I used behind the Leica APO Televid spotting scope for these pictures. Again my primary aim here (pun intended) is to capture wildlife images with the spotting scope that I carry most of the time in my pursuit of birds and wildlife anyway. As such, by simply adding a tiny camera and digital adapter to a hip pouch or shoulder strap, I'm ready to take stunning images at a moment's notice!

Hoffman's Two-toed Sloth in trees at the Canopy Tower

The Canopy Tower offers an ideal situation for digiscoping not only because you are in the tree tops in a safe, stable structure with the creatures that utilize the canopy, but because many of these creatures are anywhere from 50 to 150 feet away. With patience most will come close enough for standard SLR and telephoto lenses, but I tend to be impatient and love the fact that this digiscoping set up allows me to achieve the equivalent of a 6,000 mm lens (120x magnification)!
Geoffrey's Tamarin digiscoped from Canopy Tower, July 2007

This allows me to get up close and personal with the wildlife even when it is farther away. The Geoffrey's Tamarin above was actually much closer but I still shot this at a 35 mm equivalent of a 1720 mm lens because I wanted to see it's whiskers! ;)

EXIF data:
35 mm equivalent on camera = 86 mm
scope zoom eyepice at 20 power
or 86 mm x 20x = 1720 mm equivalent lens.
Sloth hangs out at Canopy Tower

To put that into perspective, the longest telephoto lens readily available on the commercial market is an 800 mm lens. So even at nominal camera zoom I'm far exceeding the capabilities of most telephoto systems. Plus, an 800 mm lens can reach over 2 foot in length, weigh over 20 pounds, and force you to have to re-mortgage your house. ;p The Sloth above was actually scratching but I've entitled this shot "the Thinker!"
Mantled Howler Monkey (male) hangs down to get to Cecropia fruit

There's always a good assortment of mammals "hanging out" in the trees surrounding the Canopy Tower. Both of the aforementioned sloth species, preferred the loner approach but the troops of Monkeys always seemed to come through en masse. The small Tamarins were less numerous and came and went quickly during our stay, but the Howlers were regular and numerous throughout our stay. One guest told me that the large wound on the side of the male above was a Bot Fly larvae, but don't know this for certain. Seems plausible. He explained that Vampire Bats can often make the initial wound and allow the Bot Fly to get under the flesh. Makes for a good story but I can't say for certain if this is the case.
Does anyone reading know more about this relationship or hypothesis?... would love some feedback.
male Howler Monkey stares intently at some distant subject

The ever vociferous and social Howlers were a treat to watch. Even though they are a common species throughout much of the Neotropics, I don't see these in the wild here in Florida so it was a great treat.
female Howlers with tail at the ready feeds on tree top fruit

The female Howlers were notably slimmer and smaller than the mature males lacking the distinct "mane" shown by the latter. The animal above was taking full advantage of fruiting Cecropia that surrounds the Tower. It is also worthy of note that this is not a tower in the typical sense (a narrow spire sticking up) but more of a very wide 4 story building with large observation deck ringing the top. This allows easy panoramic viewing options in any direction which is also advantageous for viewing the birds and wildlife moving through the tree-tops. It's a very unique and beautiful perspective for observing the "Canopy Express".
Mantled Howler Monkey digiscoped July 2007, Canopy Tower

These are merely a few of the many species that could be viewed by the tower and to see and digiscope them all will undoubtedly take more trips! I will share more from our 8 day trip, never fear, but for now I'll wrap it up by saying the trip was more fun than a Barrel full of Monkeys (or better yet a wild troop in their natural habitat), and we are already planning on offering this workshop again next year.
I can't wait!

Wednesday, December 16, 2009

Will the smaller 65mm scope fit my needs?...


One of the big questions spotting scope consumers have to answer is, "which size scope should I buy?" Like most manufacturers, Leica offers two different scope sizes: a larger 82 mm model (bottom) and a more compact 65 mm model (at top). The mm listing is the physical diameter of the objective lens which is opposite the smaller eyepiece. A larger objective lens allows more light to enter the optical system, meaning there is a larger circle of light entering your eye (or camera if digiscoping).

Consumers have to balance absolute optical performance with portability, and ease of use in the same way they do with binoculars. Obviously, this is a very personal decision and one that each individual has to make for themselves. To answer this fully one has to consider their individual habits to include: 'will I be using the scope at last light or first light or in very dark conditions?' (tropical rain forests for example), and 'will I tend to not carry a heavier scope?' I suspect the latter question is most important actually because if the size and weight will preclude or dissuade you from using the scope then clearly the more compact, lightweight option is for you!

left to right Kenn Kaufman, Bill Thompson, III, and Pete Dunne at Asa Wright Nature Centre
Along that line, while I certainly feel the APO Televid 82 mm represents the pinnacle of optical performance, I would never discourage anyone from looking toward the smaller APO Televid 65 mm spotting scope either. I think it is superb and it definitely outperforms its predecessor and rivals the performance of our older 77 mm models. Naturally, being an employee of Leica, I'd suspect people will find my commentary suspect, so I'd also like to offer some thoughts from other unbiased individuals.

Bill Thompson III of Bird Watcher's Digest magazine made the following comments regarding the new Televids after trying both on a recent trip to Asa Wright in Trinidad and Blue Water's Inn, Tobago, '...I used the 82 & 65 and loved them both, but where portability and weight were a factor, I preferred the 65 mm. Even in digiscoping where light is crucial, I feel I only missed the light gathering of the 82 mm when I was digiscoping Oilbirds in near complete darkness...'

Read more of Bill's exploits in Trinidad & Tobago here:
http://billofthebirds.blogspot.com/search/label/birding%20in%20Trinidad%20and%20Tobago
and particularly about digiscoping at Asa Wright Nature Centre here:
http://billofthebirds.blogspot.com/2009/08/digiscoping-at-asa-wright.html

Of course, while commentary like mine and Bill's (and others) is clearly helpful, these are still opinions and as I already pointed out scope selection is a very personal endeavor. As such, I feel that often images can speak louder than words. While I've carried the 65 mm Televid scope around, I hadn't really run it through its paces properly so I decided to use it solely at the recent "Festival of the Cranes" at Bosque Del Apache NWR last month.

The following images were all shot through the Leica APO Televid 65 mm spotting scope using the Leica D-Lux 4 camera and matched digital adapter at the festival. I'll let the images speak for themselves and leave it to you to judge your thoughts on performance!

No crane fest would be complete without cranes,
so here are two Sandhill Cranes dropping in from on high.

Townsend's Solitaires were common in Juniper habitats
in the foothills of the nearby mountains.

Greater Sandhill Cranes probe in mud for small invertebrates!

fresh plumaged Red-winged Blackbird males show
tawny-golden feather edges on their backs.

the bird above shows these feather edgings on its crown as well.

an adult Prairie Falcon is washed in pink early morning light as the sun just rises!

an adult female Northern Harrier (Hen Harrier in Europe...) cranes its neck

an "Oregon" race Dark-eyed Junco feeds on seed heads

immature Aplomado Falcon perched up at sunset

Bald Eagle pair sillhouetted at sunrise

male American Kestrel perches on a wire near noon!

Wednesday, October 28, 2009

quick comparison

In the comments section of my last post I was asked why I prefer digiscoping. The crux of my explanation was that I'm a birder first and photographer second, but I also alluded to the differences between the two set ups particularly as it relates to magnification.


The image of the Red-headed Woodpecker above was digiscoped through the Leica APO Televid 82 mm spotting scope with the D-Lux 4 camera at the equivalent of near 1800 mm lens. (ISO 100, 1/160th sec, f/2.8, +0.3 stop)


This is the same image with a bit of photoshop magic applied. I've assumed 400 mm is the most common length lens for bird photography, with a 1.5x crop factor on the DSLR body. What this means in lay terms is that the sensor in many common DSLR bodies is smaller than a 35 mm film frame so the subsequent captured image is magnified a bit to reach the size of a 35 mm film frame. The net effect is that a camera lens that is rated as a 400 mm on a film body, will offer 1.5x the magnification, or the subsequent subject size will be comparable to that of a 600 mm lens shot on 35 mm film.


At any rate, 600 mm is 1/3 rd the size of my 1800 mm so in the image above I've reduced the size of the original image to 1/3rd the size of the original. Then utilizing cut & paste techniques filled in to create a uniform sky and extended the pole to offer a the illusion of an accurate comparison of subject size difference between my image and that of someone shooting with a 400 mm lens right next to me.


I took my image of the bird from across the road on top of a phone pole. The DSLR photographer could naturally move closer, but the perspective would change dramatically and the subsequent image would be staring straight up the bird's back or side to accomodate a closer distance.


Wilson's Plover digiscoped w/ Leica APO Televid 77 & C-Lux 2 camera

The image above was taken 2 years ago on the "beach photo safari" at the Florida Bird & FotoFest in St. Augustine, FL. The walk is designed for long lens photogs to get images of gulls, terns, and shorebirds in late evening light. They are driven out to a distant point of a barrier island where these birds concentrate. When they arrive, they target a specific bird or group of birds, then drop to their bellies and slowly crawl across the sand toward their subjects.

I went along to bird and see what was out there as this point would normally require a VERY long trudge through sand taking a couple hours. As the happy photogs were slowly inching toward their subjects I happily snapped a few shots from the truck over their heads not even bothering to crouch let alone belly crawl.

Then I continued birding recording over 30 species of birds including other gems like Snowy Plover, Lesser Black-backed Gull, Northern Gannet, Red Knot, and 6 species of terns. I was the only one in the group carrying binoculars let alone a scope. About an hour later one happy photog returned to the truck wet and cold, and proudly showed me his best image. He didn't know what it was but was thrilled with the result he'd gotten and asked me what it was. I explained it was a Wilson's Plover and pulled my point & shoot out of my pocket and showed him near the exact image as seen above. So in this instance at least it seemed that digiscoping produced near the same exact result with much less effort with a lot of time left over to appreciate the many bird species out there.

Granted, if a Peregrine had winged up the beach, I would not have gotten an image likely by digiscoping, but I'd still have enjoyed the view of the mighty bird streaking past. If one of the beach bound photographers had even noticed the bird going by and knelt or stood up they might have gotten the image, but would still not have the appreciation for the powerful flight with wingtips arcing smoothly up and then rolling downward like a wave while peering through their small viewfinders.

As I said at the outset, it's just a matter of preference and perspective and under varying conditions each style of photography will outperform the other. If you are more likely to tuck the binoculars away and do without a scope, and are willing to creep or sneak in on birds to get within 20-30', then the DSLR with telephoto is likely the way for you. For me though, I prefer to simply setup the scope, mount the camera and take the shot to not miss too much of the wildlife activities around me.

Thursday, September 3, 2009

Digiscoping 4 - when is "FAR", too far?!?...

Often while working the Leica booth at some consumer show, someone will look through one of my sample binoculars and ask, "How far can you see with these?" To which I invariably respond, 'How far you can see is really dictated by atmospheric conditions. A binocular or spotting scope doesn't make you see any farther than you can with your naked eye, it only makes the subjects appear larger and/or closer depending on the power of magnification.' Of course, quality of glass, coatings, and construction of any product can make a BIG difference in the ability to resolve fine details at comparable powers of magnification, but even the best glass can't make you see any farther.

With a digiscoping rig, it is much the same. These systems allow greater magnification than any other commercially available photographic equipment (often out to the equivalent of 6,000 mm or near 120x of magnification!) None-the-less, making full use of this magnification will always be greatly affected by atmospheric conditions that change from spot to spot and from one moment to the next. When you listen to weather reports you will often hear, "...visibility is limited to X miles..." (or km perhaps) as the atmosphere allows.

large bull Elk digiscoped @ ~500 yards, Rocky Mt. National Park, CO 8/5/09

The image of the large lounging Elk above was taken with the new Leica APO Televid 82 mm scope, D-Lux 4 camera, and matched digital adapter 4. Using a Geovid range-finding binocular I was able to determine this individual was ~500 yards away - a bit over 1/4 mile or just under 1/2 km for sake of reference. As you can see the system allowed me to capture this big boy well enough. He's in focus, well lit, colors are accurate, but at that distance near mid-day, under a hot sun (especially for high elevation tundra) this is the most detail I could muster even with the best equipment!
Elk digiscoped Rocky Mountain National Park, CO 8/5/09

The elk pictured above was taken at the same time from the same spot with the same equipment. The only difference here was the subject was considerably closer, between 250 & 300 yards or near half the distance as the group shown at top. You can see here, with all else being equal how much more detail is preserved on the closer subject. Individual details like the hairs on the velvet-covered antlers, and sinewy lines on the body are that much more apparent.


The lesson learned?!?... simple, while digiscoping allows you to "reach out and capture" a very distant subject, I'm certain all who digiscope will agree that your images will always be comparatively better if you are closer and using less zoom. How good or bad these images are is often dictated by a number of factors including:

1) the quality of your equipment - your system will only perform to the maximum capabilities of the weakest link in your system obviously. e.g. the highest quality camera in the world being shot through a low-quality/low-end lens (or scope in the case of digiscoping) can not offer premium quality images. Same is true of poor quality camera through great scope!


2) atmosphere - particles in the air from wind borne dust/dirt, to relative humidity, etc. will all affect overall imaging.


Let's consider atmospheric disturbances for a moment, my friend Bill Schmoker often refers as this as "bad air". When there is a lot of atmospheric disturbance this seems to manifest itself as "noise" the tiny 'off-colored pixels in images. Noise in digital photography is similar to what we would have could grain or graininess in film photography. These odd-colored pixels detract from the overall resolution of your subject making it appear less- sharply focused.


For sake of argument if we consider this disturbance as perhaps a dirty window pane between you and your subject. When we triple the distance to our subject lets consider that we've added an additional two planes of dirty glass. You see where I'm going here. There really is almost no way to correct this short of getting closer to the subject although this could change over minutes. Bill also suggested different angles but this is only going to be marginally effective.


a view of distant Little Tobago Island taken with a Leica D-Lux 4 camera 7/2009

I know some digiscopers who won't even bother taking a distant shot as their only goal is to get and take just the highest quality images. For me though, I'm interested in recording my memories, documenting different plumages on birds, and even in some extreme cases documenting a rare sighting. As such, I always "shoot first & ask questions later"! ;p Memory cards are cheap and deleting is an easy and painless process. Most of the time when I have low expectations that a distant shot will turn out, I find I'm right, but once in a while you'll be surprised! That's why I always take a shot anyway. The image above was a scenic shot taken near the Blue Waters Inn in Tobago showing distant Little Tobago Island, a well-known breeding colony for otherwise seldom seen seabirds! You can just make out the gleam of a light-colored house (a tiny white square in the photo) siting to the left of the pass between the two smaller, nearer islands in this photo.


Tobago island house digiscoped from Blue Waters Inn, Tobago.


As I viewed this distant, now abandoned, home I thought, "I wonder how that would look digiscoped?" It was late in the day, it was warm and I was shooting across water. My expectations were real low, but this was one of these instances where I was surprised at the results. It was not overly noisy, and the details are still QUITE noticeable, see where the roof has been damaged at the right corner?... the blinds are askew in the top right window on the near side, and hey is there someone looking back out at me here?!?... ;o Just kidding here, this house is vacant.

"Small Tortoiseshell" butterfly - digiscoped in Rutland Waters, UK - 8/09

The small butterfly I digiscoped from the Leica stand at the recent British Bird Fair in the UK (Small Tortoiseshell) was also through the APO Televid 82 mm spotting scope with the new kit - D-Lux 4 camera & matched digital adapter 4. This shot was taken @ minimal focus near 12 feet (4 meters) away. At this closest range one can actually make out individual powdery scales on the hind wing of this critter. This only requires a bit of light. I'd consider this "best case", the image below represents near the worst!


Scaly-naped Pigeon digiscoped on Little Tobago Island 7/09

Normally, this image would warrant an immediate move for the "delete" key. However, this image held special purpose. Scaly-naped Pigeon is a species that has been expanding it's range through the Caribbean islands and had been recorded only 4 times in Tobago since the first sighting in 2002 (still not recorded from Trinidad a bit further south). The bird was feeding on a distant ridge on the opposite side of a large cove. The bird was TOO distant for a good clear image, the light too poor, and atmospheric disturbance too high. None-the-less, even this horrible image was enough to show overall coloration of the bird, you can see albeit not clearly that the base of the bill is red with a yellow tip, and that there is a reddish ring around the eye. Enough to show this as a Scaly-naped Pigeon. As a result of my sending this to local bird experts in Trinidad & Tobago, locals were able to be assured that we had indeed seen this species and numerous locals were able to relocate this small flock which may well represent the first colonists of this rare bird in Trinidad & Tobago. So sometimes even a "bird too far" (sounds like a movie) can have its place!

Monday, July 6, 2009

Digiscoping basics 3 - selecting an adapter

crazed digiscoper lines up on a distant subject! ;p

No spotting scope has ever been developed with use of a digital point & shoot camera in mind. Conversely, no small p&s camera has ever been designed to couple with a spotting scope; these smaller p&s are generally designed for the masses with close range portraiture and scenic shots in mind (perhaps even a bit of macro for fun). However, through trial & error we've discovered that these two items can indeed be used together to achieve amazing images!


Since neither piece was designed with the other in mind, it has been left to inventive individuals to craft devices to couple cameras & scopes effectively. In the early days of digiscoping experimentation this was done with soda bottles, PVC plumbing fittings, balsa wood, & lots of duct tape. Some designs worked quite well, while others.... well...


Today, digiscoping is a bit more user friendly as major optics manufacturers have recognized digiscoping potential and popularity and most have added at least one branded adapter for use with their products (often more). You can also find a wide array of aftermarket products designed for universal application on many camera and scope models.

generic platform style adapter
The piece above is representative of a fairly standard example of aftermarket, universal digiscoping adapter. It utilizes a vice clamp that tightens onto the spotting scope eyepiece, so it can be used on nearly any scope. The plastic platform accommodates nearly any digiscoping cameras via the 1/4"x20 threaded tripod mount (found on the bottom of the camera). The mounting platform is slotted on two sides so cameras with center, left, or right side tripod mounts can be used. It has separate controls to adjust the height of the platform, and another that moves from side to side allowing you to get the camera properly centered behind the scope. The slots also allow you to adjust for the proper distance between the eyepiece and the camera lens as well.

These adapters are a great alternative for older scope models, or scopes without a manufacturer's branded solution. They are also great for digiscoping experimentation due to their comparatively inexpensive price points. However, as with any design there are drawbacks as well. Generally speaking, a more universal (versatile) adapter that accommodates many scopes and cameras, requires a greater range of adjustment making the piece more complex, and larger in size & weight.
These "platform-style" universal adapters generally suffer from repeatability issues as well, because they have so many moving parts, they often aren't mounted in the same spot on the eyepiece, and because (as with all platform style adapters) the camera is prone to turning on its axis. Their larger comparative size make these more difficult to carry. While I would rate these as the least user friendly option available, sometimes with off-brand or old model scopes they may be the only option.
generic "screw-thread" universal adapter
Most early cameras had filter thread rings (or threaded accessory adapters) on the end of the camera lens. As such, one of the most common early adapter styles (and still one of the most popular) is the threaded tubular mount adapter. The model above is an example of the earliest style, which was designed for all scopes. To accommodate many eyepiece widths the tube was over sized to fit over even the widest of eyepieces. Here again, the universal application led to difficulties in use. You were required to use three different set screws to fill the gap left between the eyepiece and the inner wall of the over sized adapter. While a great idea in theory, in practice this was time consuming and it was difficult to get the camera centered as tightening one screw often moved the camera back out of center. For stationary subjects where time was no issue this is not a huge disadvantage, but many wildlife images were missed while still fighting to get the camera centered.

Driven by consumer demand, the next generation of tubular adapters were machined to fit specific eyepiece widths. Unlike their universal predecessors, these improved tubular designs (similar to the NEW Leica digital adapter 4 at bottom) fit a specific eyepiece perfectly, slipped on quickly, and the camera was always centered. These adapters have been the choice of many digiscoper in the years since due to their simplicity, compact size, and mounting speed.

Unfortunately, in recent years most digital p&s camera models have discontinued offering accessories, and now there are almost no p&s cameras offer filter threads (maybe 2 or 3 in a field of hundreds). As such, individuals wanting to digiscope with these adapters were forced to seek out a single specific camera model or two. They are now very restrictive as a result. This design can also offer problems as you stack adapters and threaded bushings to connect the camera to the threaded adapter, because the camera lens can be too far from the eyepiece to work to its full potential (see effects of this in post "digiscoping basics 2 - lining up the camera").

Leica digital adapter 2 adapter

In 2006 Leica introduced its unique digital adapter 2. This design took advantage of the mounting speed of the popular tubular design, but featured a revolutionary clamp design allowing use of nearly any digiscoping p&s camera! Two rubber-padded clamp jaws could be adjusted to hold a smaller digital p&s, camera phone and even some smaller video cams in place without dependence on threads. This opened the field to hundreds of camera models.


As with other designs though this increased versatility and compatibility does make the piece a bit larger. The Leica digital adapter 2 (DA2) was machined exclusively to the diameter of the Leica 20-60x zoom, 20x wide-angle, and 32x wide-angle eyepieces, but not other brands. Some of the "tinkerers" in the market were able to adapt this to some other eyepieces with smaller diameters, but again this took a bit of creativity to shim the excess space evenly.
revolutionary Leica digital adapter 2 with unique clamp design
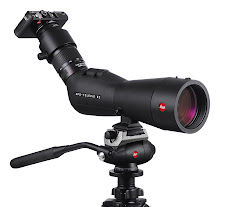
In January 2009, Leica brought the new 82 mm Televid spotting scope to the marketplace featuring the first wide-angle zoom eyepiece ever developed. The wide-angle 25-50x zoom eyepiece was both taller and wider than Leica's previous eyepiece models so the digital adapter 2 would not fit over this.

Leica digital adapter3, APO Televid 82 mm spotting scope, & C-Lux camera

Leica introduced the new digital adapter 3 in January of this year. This piece is similar in design to the DA2, but utilizes a unique twist-lock connector at it's base and increased adjustment to accommodate all of the Leica eyepieces from the shorter, thinner former 20x to the largest of the line the new 25-50x wide angle. As such it also will mount to other brand spotting scopes to include many Kowa, Swarovski, Zeiss, & other models with an eyepiece diameter between 53 - 68mm.

Leica digital adapter 3
The digital adapter 3's unique twist-lock, tightens evenly from all sides insuring the camera is instantly centered on many eyepieces, and it incorporates a mechanical cable release arm (see second image up). Since this versatile adapter can be adjusted to accommodate so many eyepieces and cameras, it also appears somewhat complex and is larger (and more expensive) than its predecessor.

Leica digital adapter 4 prototype

However, never fear, for those who prefer simplicity there are options as well. In late summer 2009, Leica will introduce a VERY simplistic option when they introduce the new digital adapter 4. The new DA4 will be machined precisely to the diameter of the 25-50x wide angle eyepiece and will mount directly to only one camera model - the Leica D-Lux 4. By making this piece an exclusive mount for only one camera on a single eyepiece model, you have no need for additional adjustments resulting in a very compact and simplistic adapter.

So if you are wanting to mount a variety of cameras on varying eyepieces or if you simply want to slide the camera on and push the button, the new Leica line-up will offer solutions for all.