Showing posts with label waterproof. Show all posts

Sunday, January 10, 2010

Binocular Basics - 2: numbers


All binocular models have a a brand and model name followed by a series of numbers to describe them. This "nomenclature" can give you some important information about the binocular. However, it requires a bit of knowledge to understand how these characteristics affect performance.

The binocular model above is a Leica 7x42 Ultravid HD. Leica of course is the manufacturer, and the model name is the "Ultravid HD". The model name is derived from the Latin root "vid" meaning "to see", and HD indicates that this model contains the highest level of flouride-infused glass, offering the best possible color rendition possible. Manufacturer & model numbers are of course random and vary between models, and don't tell you much about performance. The "nomenclature", however, (the series of numbers) are consistent throughout the industry and tell the consumer a lot about the product.

The product above is an older model, a Leica Trinovid 10x42 BN. Lets consider just the nomenclature on this product the "10x42" portion - "10x" describes the power of magnification. As you'd suspect, this binocular magnifies the subject 10 times. This means your subject will appear 10 times larger or 10 times closer than it does when viewed with your eyes alone.


The image above is a representation of a subject at 1x and 10x respectively. Unfortunately, at this size the graphic is not very effective because it is difficult to see well. The most popular powers of magnification in binoculars are generally 7x, 8x, and 10x. It is common for people to assume more magnification is better than less. However, it is important to remember that you are not only magnifying your subject, but you are also magnifying all the hand shake and movement from wind, etc.

Most people cannot hold a binocular with more than 10x magnification still enough to benefit from the increased power. As a matter of fact, many are surprised to realize that when comparing binocular models within the same manufacturer's line, that they resolve details better with a lower-powered binocular. When trying to decide which binocular is right for you, it is best to use a resolution chart (the optical equivalent of an eye chart). In lieu of a resolution chart, a dollar bill (or similar) usually offers suitable fine print for this test. Simply, hang one to the wall and compare which binocular power within a given line allows you to discern more detail. For me, I find I can discern more detail with a lower-powered binocular. I just can't hold a higher-powered glass steady enough to benefit from the increased power, and typically use a 7x42 binocular (7 times magnification) - I feel I see more detail on a smaller and brighter subject.


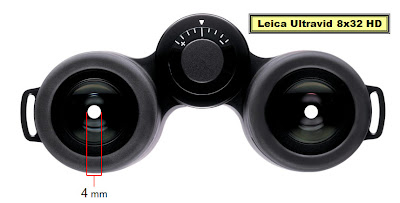
The second number describes the diameter of the objective lens in millimeters. The binocular above is an Ultravid 8x32. It magnifies 8x and the objective lens is 32 mm wide. In this binocular a 32 mm circle of light enters the binocular (the diameter of the objective), however for every 1x of magnification you must reduce the size of the circle of light entering your eye by the same power. Therefore, the circle of light seen coming out of the eyepiece & entering your eye is 32 mm divided by 8x, or 4 mm (see above). This circle of light is defined as the "Exit Pupil".


How does exit pupil affect binocular performance?.... Well again, all else being equal (assuming we are considering one particular line of a given manufacturer's products), a larger exit pupil means more light enters your eye.


In bright light, when your pupil is fully constricted, exit pupil is less important. However, in low lighting conditions your pupil dilates/expands. So an exit pupil of 4 mm may not fill every cone and rod in your pupil, where the 7x42 above with a 6 mm exit pupil will deliver a brighter image with superior resolution under these conditions. Also, as your hands shake, a smaller circle of light will be harder to stay over your pupil, while a larger exit pupil will continue to deliver consistent light to your eye. While your brain may well assimilate the image, over a full day's use your eye may feel more strain and discomfort with a smaller exit pupil, compared to the binocular with the larger exit pupil (once again assuming the same binocular quality/line).


Of course, this is but one consideration in binocular selection, and each individual will have to balance power & objective size, versus binocular size/weight & ease of use/ergonomics. This personal balance will obviously vary from user to user, but I think it safe to say that if "lightweight" and "compact" are two of your main criterion for binocular selection, it is true to suggest that within a given line, this cannot be achieved without sacrificing some optical performance. However, we will consider this fully in another post!

Wednesday, December 16, 2009

Will the smaller 65mm scope fit my needs?...


One of the big questions spotting scope consumers have to answer is, "which size scope should I buy?" Like most manufacturers, Leica offers two different scope sizes: a larger 82 mm model (bottom) and a more compact 65 mm model (at top). The mm listing is the physical diameter of the objective lens which is opposite the smaller eyepiece. A larger objective lens allows more light to enter the optical system, meaning there is a larger circle of light entering your eye (or camera if digiscoping).

Consumers have to balance absolute optical performance with portability, and ease of use in the same way they do with binoculars. Obviously, this is a very personal decision and one that each individual has to make for themselves. To answer this fully one has to consider their individual habits to include: 'will I be using the scope at last light or first light or in very dark conditions?' (tropical rain forests for example), and 'will I tend to not carry a heavier scope?' I suspect the latter question is most important actually because if the size and weight will preclude or dissuade you from using the scope then clearly the more compact, lightweight option is for you!

left to right Kenn Kaufman, Bill Thompson, III, and Pete Dunne at Asa Wright Nature Centre
Along that line, while I certainly feel the APO Televid 82 mm represents the pinnacle of optical performance, I would never discourage anyone from looking toward the smaller APO Televid 65 mm spotting scope either. I think it is superb and it definitely outperforms its predecessor and rivals the performance of our older 77 mm models. Naturally, being an employee of Leica, I'd suspect people will find my commentary suspect, so I'd also like to offer some thoughts from other unbiased individuals.

Bill Thompson III of Bird Watcher's Digest magazine made the following comments regarding the new Televids after trying both on a recent trip to Asa Wright in Trinidad and Blue Water's Inn, Tobago, '...I used the 82 & 65 and loved them both, but where portability and weight were a factor, I preferred the 65 mm. Even in digiscoping where light is crucial, I feel I only missed the light gathering of the 82 mm when I was digiscoping Oilbirds in near complete darkness...'

Read more of Bill's exploits in Trinidad & Tobago here:
http://billofthebirds.blogspot.com/search/label/birding%20in%20Trinidad%20and%20Tobago
and particularly about digiscoping at Asa Wright Nature Centre here:
http://billofthebirds.blogspot.com/2009/08/digiscoping-at-asa-wright.html

Of course, while commentary like mine and Bill's (and others) is clearly helpful, these are still opinions and as I already pointed out scope selection is a very personal endeavor. As such, I feel that often images can speak louder than words. While I've carried the 65 mm Televid scope around, I hadn't really run it through its paces properly so I decided to use it solely at the recent "Festival of the Cranes" at Bosque Del Apache NWR last month.

The following images were all shot through the Leica APO Televid 65 mm spotting scope using the Leica D-Lux 4 camera and matched digital adapter at the festival. I'll let the images speak for themselves and leave it to you to judge your thoughts on performance!

No crane fest would be complete without cranes,
so here are two Sandhill Cranes dropping in from on high.

Townsend's Solitaires were common in Juniper habitats
in the foothills of the nearby mountains.

Greater Sandhill Cranes probe in mud for small invertebrates!

fresh plumaged Red-winged Blackbird males show
tawny-golden feather edges on their backs.

the bird above shows these feather edgings on its crown as well.

an adult Prairie Falcon is washed in pink early morning light as the sun just rises!

an adult female Northern Harrier (Hen Harrier in Europe...) cranes its neck

an "Oregon" race Dark-eyed Junco feeds on seed heads

immature Aplomado Falcon perched up at sunset

Bald Eagle pair sillhouetted at sunrise

male American Kestrel perches on a wire near noon!

Thursday, September 3, 2009

Digiscoping 4 - when is "FAR", too far?!?...

Often while working the Leica booth at some consumer show, someone will look through one of my sample binoculars and ask, "How far can you see with these?" To which I invariably respond, 'How far you can see is really dictated by atmospheric conditions. A binocular or spotting scope doesn't make you see any farther than you can with your naked eye, it only makes the subjects appear larger and/or closer depending on the power of magnification.' Of course, quality of glass, coatings, and construction of any product can make a BIG difference in the ability to resolve fine details at comparable powers of magnification, but even the best glass can't make you see any farther.

With a digiscoping rig, it is much the same. These systems allow greater magnification than any other commercially available photographic equipment (often out to the equivalent of 6,000 mm or near 120x of magnification!) None-the-less, making full use of this magnification will always be greatly affected by atmospheric conditions that change from spot to spot and from one moment to the next. When you listen to weather reports you will often hear, "...visibility is limited to X miles..." (or km perhaps) as the atmosphere allows.

large bull Elk digiscoped @ ~500 yards, Rocky Mt. National Park, CO 8/5/09

The image of the large lounging Elk above was taken with the new Leica APO Televid 82 mm scope, D-Lux 4 camera, and matched digital adapter 4. Using a Geovid range-finding binocular I was able to determine this individual was ~500 yards away - a bit over 1/4 mile or just under 1/2 km for sake of reference. As you can see the system allowed me to capture this big boy well enough. He's in focus, well lit, colors are accurate, but at that distance near mid-day, under a hot sun (especially for high elevation tundra) this is the most detail I could muster even with the best equipment!
Elk digiscoped Rocky Mountain National Park, CO 8/5/09

The elk pictured above was taken at the same time from the same spot with the same equipment. The only difference here was the subject was considerably closer, between 250 & 300 yards or near half the distance as the group shown at top. You can see here, with all else being equal how much more detail is preserved on the closer subject. Individual details like the hairs on the velvet-covered antlers, and sinewy lines on the body are that much more apparent.


The lesson learned?!?... simple, while digiscoping allows you to "reach out and capture" a very distant subject, I'm certain all who digiscope will agree that your images will always be comparatively better if you are closer and using less zoom. How good or bad these images are is often dictated by a number of factors including:

1) the quality of your equipment - your system will only perform to the maximum capabilities of the weakest link in your system obviously. e.g. the highest quality camera in the world being shot through a low-quality/low-end lens (or scope in the case of digiscoping) can not offer premium quality images. Same is true of poor quality camera through great scope!


2) atmosphere - particles in the air from wind borne dust/dirt, to relative humidity, etc. will all affect overall imaging.


Let's consider atmospheric disturbances for a moment, my friend Bill Schmoker often refers as this as "bad air". When there is a lot of atmospheric disturbance this seems to manifest itself as "noise" the tiny 'off-colored pixels in images. Noise in digital photography is similar to what we would have could grain or graininess in film photography. These odd-colored pixels detract from the overall resolution of your subject making it appear less- sharply focused.


For sake of argument if we consider this disturbance as perhaps a dirty window pane between you and your subject. When we triple the distance to our subject lets consider that we've added an additional two planes of dirty glass. You see where I'm going here. There really is almost no way to correct this short of getting closer to the subject although this could change over minutes. Bill also suggested different angles but this is only going to be marginally effective.


a view of distant Little Tobago Island taken with a Leica D-Lux 4 camera 7/2009

I know some digiscopers who won't even bother taking a distant shot as their only goal is to get and take just the highest quality images. For me though, I'm interested in recording my memories, documenting different plumages on birds, and even in some extreme cases documenting a rare sighting. As such, I always "shoot first & ask questions later"! ;p Memory cards are cheap and deleting is an easy and painless process. Most of the time when I have low expectations that a distant shot will turn out, I find I'm right, but once in a while you'll be surprised! That's why I always take a shot anyway. The image above was a scenic shot taken near the Blue Waters Inn in Tobago showing distant Little Tobago Island, a well-known breeding colony for otherwise seldom seen seabirds! You can just make out the gleam of a light-colored house (a tiny white square in the photo) siting to the left of the pass between the two smaller, nearer islands in this photo.


Tobago island house digiscoped from Blue Waters Inn, Tobago.


As I viewed this distant, now abandoned, home I thought, "I wonder how that would look digiscoped?" It was late in the day, it was warm and I was shooting across water. My expectations were real low, but this was one of these instances where I was surprised at the results. It was not overly noisy, and the details are still QUITE noticeable, see where the roof has been damaged at the right corner?... the blinds are askew in the top right window on the near side, and hey is there someone looking back out at me here?!?... ;o Just kidding here, this house is vacant.

"Small Tortoiseshell" butterfly - digiscoped in Rutland Waters, UK - 8/09

The small butterfly I digiscoped from the Leica stand at the recent British Bird Fair in the UK (Small Tortoiseshell) was also through the APO Televid 82 mm spotting scope with the new kit - D-Lux 4 camera & matched digital adapter 4. This shot was taken @ minimal focus near 12 feet (4 meters) away. At this closest range one can actually make out individual powdery scales on the hind wing of this critter. This only requires a bit of light. I'd consider this "best case", the image below represents near the worst!


Scaly-naped Pigeon digiscoped on Little Tobago Island 7/09

Normally, this image would warrant an immediate move for the "delete" key. However, this image held special purpose. Scaly-naped Pigeon is a species that has been expanding it's range through the Caribbean islands and had been recorded only 4 times in Tobago since the first sighting in 2002 (still not recorded from Trinidad a bit further south). The bird was feeding on a distant ridge on the opposite side of a large cove. The bird was TOO distant for a good clear image, the light too poor, and atmospheric disturbance too high. None-the-less, even this horrible image was enough to show overall coloration of the bird, you can see albeit not clearly that the base of the bill is red with a yellow tip, and that there is a reddish ring around the eye. Enough to show this as a Scaly-naped Pigeon. As a result of my sending this to local bird experts in Trinidad & Tobago, locals were able to be assured that we had indeed seen this species and numerous locals were able to relocate this small flock which may well represent the first colonists of this rare bird in Trinidad & Tobago. So sometimes even a "bird too far" (sounds like a movie) can have its place!

Monday, June 29, 2009

Digiscoping basics 2 - Lining up the camera

"American Green-winged Teal" digiscoped Arcata, CA 4/2009
When coupling a small digital point & shoot (p&s) camera behind a scope with a zoom eyepiece you will always see some sort of vignetted dark circle around the subject. As I've stated previously this is not a big issue and it typically disappears when you increase your camera zoom. Fixed wide-angle eyepieces will often not show this vignetting, but like most scope users I prefer the versatility of the zoom.
I actually like to use this circle to tell if my camera is centered properly over the eyepiece. When centered, the blackened sections of the image will appear uniform on either side of the screen and look the same at top & bottom.

If not centered properly, the vignette will disappear from one edge but not the opposite (as above) or perhaps from all but one corner of the image as you increase scope zoom. This is a clear indicator that your camera is off center. In the example shown above, the camera is a bit too far to the right and needs to be adjusted slightly to the left for best results. Remember, that the circle we are working with is less than 4 mm wide so adjustments will be slight. These seemingly small differences will become even more problematic as you increase the scope zoom because the small circle of light leaving the eyepiece (exit pupil) may be reduced from 1/2 to 1/3 its original size when you increase the scope zoom.

With our 2 dimensional adjustments made on the flat plane from side to side, up & down, and on the diagonals, we now need to turn our attention to getting the proper distance between the camera lens and the scope eyepiece.


old style, generic universal digiscoping adapter

This last adjustment seems to be the one most commonly ignored or missed in many digiscoping set ups resulting in ruined photos and great frustration. In many older, well established digiscoping websites, you may find this is largely ignored, not mentioned, or may seem unnecessary or not understood by many long time digiscopers due to inherent biases of certain types of formerly popular adapters.

The sample universal adapter above is fairly typical of most early adapters that utilized filter-thread (accessory) rings on the front of the p&s cameras as a means of attachment between the camera and adapter. Unfortunately, there are almost no current p&s models that still offer accessory threads because these units are replaced so frequently that accessories really don't seem to sell. It seems each year there maybe 2 in a field of hundreds of new digital p&s cameras that both lend themselves to digiscoping and offer filter thread rings at the front of the lens. These adapters are extremely limited as a result.

Another issue with these adapters is that due to the metal rings and adapter rings present between the two lenses these adapters almost invariably meant you could never get the two lenses too close together. As a result, many sites erringly suggest you always need to get the lenses as close as possible together for best results.

blackened, semicircular arcs appear when lenses are too close together

If you get your eye too close to a binocular lens you will get "black out" sections in your view that appear as shadowed arcs near one side of the image as seen in the image above. You don't have to take my word for it, try it for yourself. twist or roll down the eyecups on your binoculars and remove your glasses if you wear them and get the binocular eyepieces as close as possible to your eyes. You should note an effect similar to what is shown above.

Well not surprisingly, the effect is the same when coupling two lenses afocally (that is mounting a camera with a lens behind an eyepiece in this case). If the two lenses are too close together, you need to draw these apart until you see a more uniform colored background. This is particularly noticeable on light backgrounds like the sky.

when lenses are too far apart you'll note darkened corners

In the image above I've purposely pulled the lenses too far apart. If you experiment with your eye and a binocular or scope you can actually predict what happens in digiscoping as the systems really aren't too terribly different. When you move your eye away from the lens, your field of view collapses leaving just a small circle of light visible. You can see this happening in the image above as well. As the lenses are drawn apart the field begins to collapse and you begin to see shadowing at each corner of your image.

Note the difference in the terms "shadowing/shadowed edge" versus "vignetting/vignetted edge", I differentiate between these two as they indicate a different problem. As I define these terms "shadowed edges" have a bit of opacity to them - that is you can see through them a bit. A "vignetted edge" is sharply defined and completely black with no opacity.


A sharply defined blackened edge or vignette indicates you are off center or simply need to run your zoom out more. Shadowed edges generally indicate the two lenses are too far apart and need to be moved closer together. Shadowed arcs that are in the interior of the frame will have a lighter section between the shadow and the edge. When seen you should move the two lenses a bit further apart.

Not the most interesting subject I realize but to save time, I just zipped out the back door and took some sample shots of my storage shed. The light doors provided a good background to show shadowing. When the lenses are adjusted properly the field should look uniform and be devoid of shadowing & vignetting.

As I travel the country and beyond teaching digiscoping classes, I find that coupling errors are responsible for a majority of common digiscoping image problems/failures. Hopefully some will find this information helpful. As always, if there are ever any questions feel free to ask in the comments section. I'll happily address all to the best of my ability.

J